Transcripción exacta relies heavily on the quality of your audio. Even the best Herramientas de transcripción basadas en IA can struggle with background noise, low volume, or overlapping speech.
If your audio is messy, your transcript will be too—leading to extra time editing and correcting mistakes.
That’s why cleaning your audio before transcription is one of the smartest moves you can make.
In this guide, we’ll walk you through practical steps to clean up noisy audio and get the best results from any transcription app.
🎧 1. Use a Noise Reduction Tool
Noise reduction is your first line of defense against poor audio quality.
🛠 Recommended Tools:

- Audacity (Free): Audacity is a free, open-source audio editor used for recording, editing, and cleaning up sound. I highly recommend it.
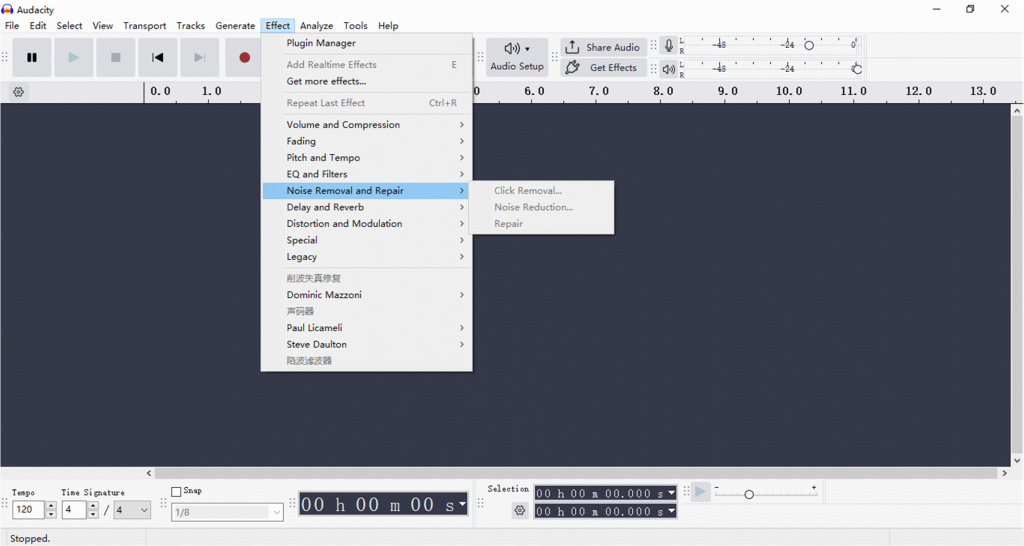
- Import your audio.
- Select a segment with just background noise.
- Ir a Effect > Noise Reduction > Get Noise Profile.
- Then select the entire audio and apply the noise reduction.
- Adobe Audition (Paid):
- Utilice Noise Reduction (process) o Adaptive Noise Reduction under the Effects panel for precise control.
- Krisp / NVIDIA RTX Voice (Real-Time):
- These tools remove background noise during live recording or calls, great for reducing problems at the source.

Consejo: Always listen to your cleaned audio to make sure it doesn’t sound “robotic” or overprocessed.
✂️ 2. Trim Silence and Unnecessary Sounds
Long pauses, filler noise, and irrelevant chatter confuse transcription tools and waste time.
What to remove:
- Long silences
- Coughs, sneezes
- Background conversation
- Echoey reverb tails
You can use Audacity, Ocenaudio, or other basic editors to cut these manually or with silence detection features.
🎚️ 3. Normalize and Balance Audio Levels
If one speaker is too loud and another is too soft, AI might miss words or confuse speakers. Normalizing helps maintain consistent volume across the recording.
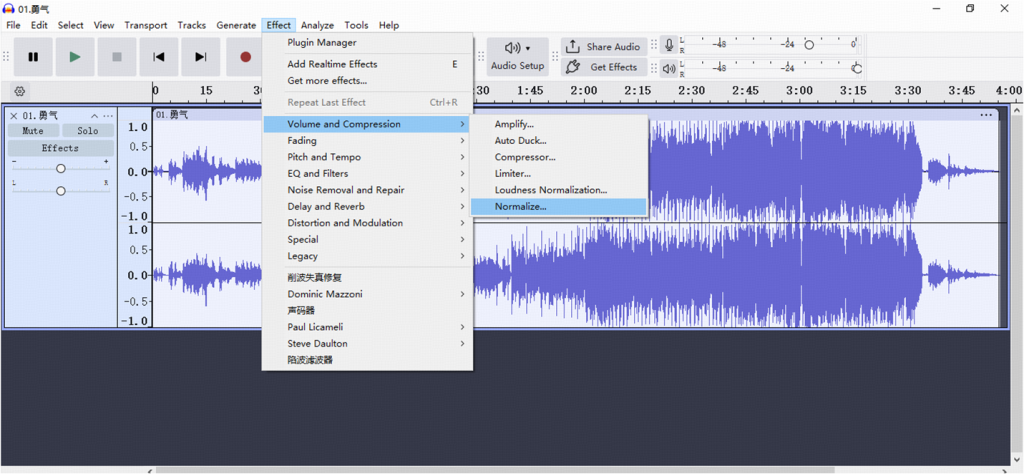
How to Normalize in Audacity:
- Select the full track.
- Ir a Effect > Normalize.
- Choose default settings or adjust peak level to -1.0 dB.

This makes your audio smoother and easier for transcription software to process.
🔁 4. Convert to a Compatible Format
Some transcription apps struggle with certain audio formats (like M4A). To avoid issues, convert your audio to a widely supported format.
Recommended formats:
| Format | Quality | File Size | Recommendation |
|---|---|---|---|
| WAV | Best (lossless) | Large | Ideal for maximum accuracy in transcription |
| MP3 | Good (compressed) | Small | Use high bitrate (256kbps or 320kbps) |
Tools to convert:
I provide one online tool and one that requires installation, to meet different needs.
- Conversor de audio en línea
- FFmpeg (advanced users)
👥 5. Separate Speakers (If Possible)
Transcription tools that support speaker labels perform better when audio is clean and distinct per speaker.
If you’re using multi-channel recording equipment or doing interviews, separate speaker audio tracks before uploading.
Tools for multi-speaker editing:
| Herramienta | Strengths | Weaknesses | Lo mejor para |
|---|---|---|---|
| Describa | – Automatic transcription with speaker detection – Visual text-based editing – Modern UI, beginner-friendly | – Limited fine-grained audio control – Free version has feature limits | Podcasters, content creators, interviews |
| Secuestro de audio | – Real-time multitrack recording – Route and record from multiple apps/devices – Advanced audio pipeline control | – macOS only – Weak post-editing capabilities | Multi-person interviews, live recordings |
| iZotope RX | – Industry-grade noise reduction and repair – Excellent for voice separation and de-noising – Highly customizable with plugins | – Steep learning curve – Expensive, targeted at professionals | Audio engineers, film/broadcast editors |
If speaker separation isn’t possible, just avoid people talking over each other as much as possible during recording.
✅ Bonus Tips for Better Audio (Before You Even Hit Record)
- Use an external microphone, not your laptop or phone mic.
- Record in a quiet room with soft furnishings to reduce echo.
- Do a short test recording and listen back for background noise.
- Mute notifications or computer fans during the session.
Reflexiones finales
Cleaning noisy audio might seem like an extra step, but it can save hours of editing and correction later. Whether you’re using Otter, VOMO, Notta, or any other tool, giving the AI clean input gives you clean output.
So next time you prepare a voice recording for transcription—clean it first, transcribe later.
Want to know which transcription tool works best with noisy audio? Check out our full reviews here.
