If you want to know how to turn on transcription in Zoom, the process is simple but depends on your account type and settings.
Zoom offers a live transcription feature that automatically converts meeting audio into text in real time, helping improve accessibility and record keeping. To enable transcription, you must first activate the feature in your Zoom account settings, then start or join a meeting and turn on the live transcription option.
This guide will walk you through every step and provide tips to get the most out of Zoom’s transcription capabilities, including converting both audio to text and video to text formats.
Enabling Transcription in Zoom: Step-by-Step Guide

- Log into Your Zoom Account
Visit the Zoom web portal and sign in with your credentials. - Access Settings
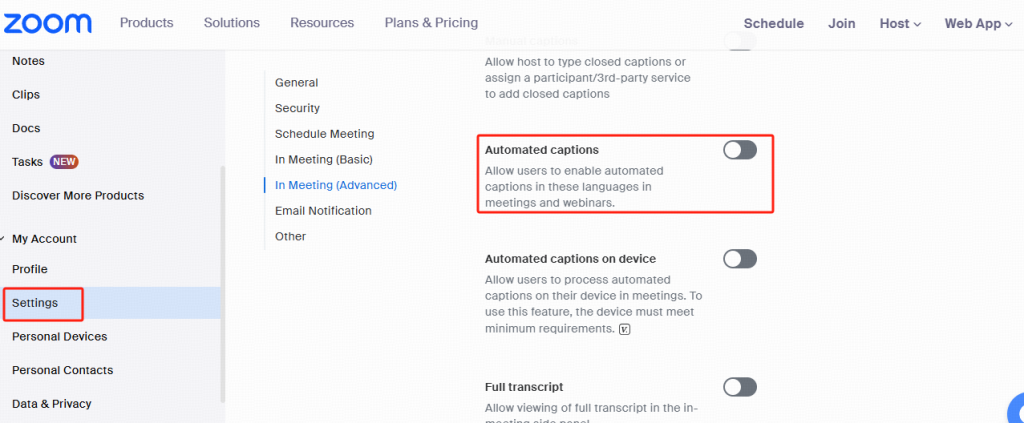
Navigate to Settings on the left sidebar. - Enable Live Transcription
Scroll down to the In Meeting (Advanced) section. Find the setting labeled “Automated captions” and toggle it ON. - Allow Participants to View Transcription
Make sure the option “Enable live transcription service to show transcript on the side panel in-meeting” is also enabled. This allows attendees to see captions during the meeting. - Save Changes
Confirm and save your settings.
How to Turn On Transcription During a Zoom Meeting
Once enabled in settings, hosts can turn on live transcription during a meeting:
- Click the “Live Transcript” button in the Zoom toolbar.
- Select “Enable Auto-Transcription” to start the live captioning.
- Participants will see captions appear in real time, and they can view the full transcript on the side panel.
This feature supports conversion from audio to text in real time, making meetings more accessible and easier to review.
Using Zoom Transcription for Video to Text Conversion
Zoom’s transcription feature isn’t limited to live meetings. When you record a meeting to the cloud with transcription enabled, Zoom generates a text transcript synced to the video. This makes it easy to search spoken content or create captions later.
The ability to convert video to text is especially helpful for webinars, recorded lectures, and video interviews where reviewing content accurately is critical.
Tips for Getting the Best Results with Zoom Transcription
- Use Clear Audio: The better the audio quality, the more accurate the transcription. Use good microphones and reduce background noise.
- Speak Clearly: Encourage participants to speak slowly and clearly.
- Check Language Settings: Zoom’s live transcription supports primarily English, so ensure your audio matches the language settings for best results.
- Edit Transcripts Post-Meeting: Zoom allows hosts to edit transcripts after meetings to correct errors.
Conclusion
Turning on transcription in Zoom is easy and enhances meeting accessibility by converting spoken audio to text and video to text seamlessly. By following the steps outlined above, you can enable live transcription for your meetings, making them more inclusive and efficient for everyone involved.


